This post may contain affiliate links. If you use these links to buy something we may earn a commission at no extra cost to you. Thank you for your support!
If you’re running a WordPress website, adding a search bar can make it easier for users to find the content they’re looking for. Fortunately, there are several ways to add a search bar to your WordPress site. One popular method is to add it as a widget, which can be easily done through the WordPress dashboard.
How To Add A Search Bar In WordPress: What Is A Search Bar?
A search bar is something you see at the top of most sites, where you key in your queries and what you’re looking for. It is typically a little square rectangle box with a magnifying glass icon within it. While some search bars can be seen only when you click on an advanced tab, we recommend having it in full view on your site right at the top of the page.
One of the best practices is to add a search bar to your website’s navigation menu. This can be done using a plugin like SearchWP Modal Search Form, which is free and easy to use. Once installed and activated, you can customize the search bar’s appearance and placement in your menu. With a search bar in your navigation menu, users can quickly search your site without having to navigate away from the page they’re on.
You may be interested in: Freelance Writing Contract Guide
Why Add a Search Bar in WordPress

If you have a WordPress website, adding a search bar can be a helpful feature for your visitors. Here are a few reasons why you should consider adding a search bar to your WordPress site:
1. Improved User Experience
When visitors come to your website, they may not know where to find the information they need. By adding a functional search bar, you can help them quickly find what they’re looking for. This can improve their overall experience on your site and make them more likely to return in the future.
2. Increased Engagement
If visitors can’t find the information they need on your website, they may leave and never come back. By adding a search bar, you can help keep visitors on your site for longer periods of time. This can increase engagement and reduce your bounce rate.
3. Easy Access to Information
A search bar can make it easier for visitors to find the information they need. Instead of having to navigate through your website’s menus, they can simply search for what they’re looking for. This can be especially helpful if you have a lot of content on your site.
4. Better Navigation
Adding a search bar to your WordPress site can also improve navigation. If visitors can’t find what they’re looking for through your menus, they can use the search bar to find it quickly. This can make it easier for them to navigate your site and find the information they need.
Overall, adding a search bar to your WordPress site can improve the user experience, increase engagement, provide easy access to information, and improve navigation. If you want to add a search bar to your WordPress site, there are several ways to do it. You can use a plugin, add it to your menu, or use a pre-built header template.
Different Ways to Add a Search Bar in WordPress (Step By Step Guide)
If you’re looking to add a search bar to your WordPress website, especially on the home page, there are several different ways to do it. Here are the most popular and effective methods:
From The Widget Panel
The easiest way to add a search bar to your WordPress site is to use the default search bar widget. Here’s how to do it:
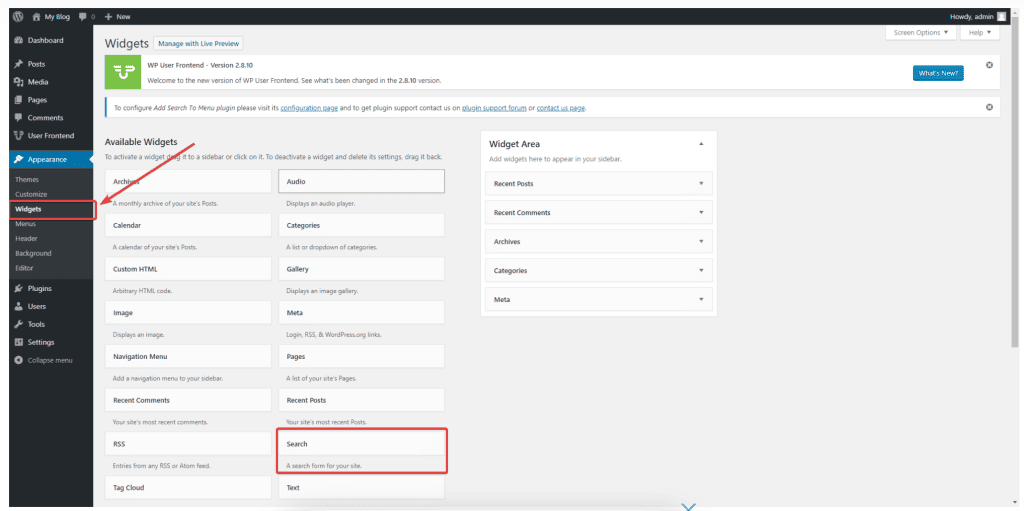
- Go to your WordPress dashboard, then to the WordPress menu bar on the left, and navigate to Appearance > Widgets.
- Find the “Search” widget and drag it to the widget area where you want to display the search bar.
- Customize the widget settings as desired, such as changing the search button text or adding a placeholder text in the search field.
- Save the changes by hitting the update button and preview your site to see the search bar in action.
Using a WordPress Plugin
Another easy way to add a search bar to your WordPress site is to use a plugin. Here are the steps to follow:
- Install a WordPress search plugin like Ivory Search or WP Fastest Site Search.
- Activate the plugin and go to its settings page.
- Customize the search bar settings, such as adding a search icon, changing the search button text, or selecting the search field location.
- Save the changes and preview your site to see the search bar in action.
Using CSS Coding
If you’re comfortable editing your theme’s code, you can add a search bar using the WordPress theme editor. Here’s how:
- Go to Appearance > Editor in your WordPress dashboard.
- Select the theme you want to edit from the dropdown menu.
- Find the header.php file and add the search function code <?php get_search_form(); ?> where you want to display the search bar.
- You should be able to see the search box in your side menu now. To customize, open up the style.css file and modify the search-form padding, height and position to fit your needs.
- Save the changes and preview your site to see the search bar in action.

Using a Page Builder Plugin (my favorite way)
If you’re using a page builder plugin like Elementor or Beaver Builder, you can add a search bar using its built-in widgets. Here’s how:
- Go to the page builder editor and add a new widget to your page.
- Select the “Search” widget from the list of available widgets.
- Customize the search bar settings, such as adding a search icon or changing the search button text.
- Save the changes and preview your site to see the search bar in action.
There is also another popular third-party plugin called the Ivory Search plugin.

Using Elementor
Go to the page you want to add the search bar to. Click ‘Edit with Elementor’ at the top, and add the Elementor search widget to that page.

Adding a WordPress Search Bar to the Navigation Menu
Adding a custom search bar to your WordPress navigation menu is a great way to make it easy for your visitors to find what they are looking for on your website. Here are the steps to follow:
First Step: Adding the Search Widget
The first step is to add the search widget to your WordPress widgets. To do this, go to your WordPress dashboard and navigate to Appearance > Widgets. Here, you will find the widget named Search under the Available Widgets. Drag and drop the Search widget to the Navigation Menu location.
Next Step: Customizing the Search Widget
Once you have added the Search widget to the Navigation Menu location, you can customize it by adding a placeholder text. This text will appear in the search box before the user types in their search query. You can also choose to show or hide the search button.
Important Role: Custom Fields
Custom fields can play an important role in the menu search feature on your website. By adding custom fields to your posts and pages, you can make it easier for users to find specific content on your website. For example, if you have a recipe website, you could add custom fields for ingredients, cooking time, and difficulty level. This will allow users to search for recipes based on specific criteria.
Publish Button
Don’t forget to click the Publish button to save your changes. Once you have done this, the search bar will appear in the navigation menu on your website.
That’s it! By following these simple steps, you can add a search bar to your WordPress navigation menu and make it easier for your visitors to find what they are looking for on your website.
You may be interested in: How Freelance Writers Charge
Adding a Search Bar to the Sidebar
If you want to make your WordPress website more user-friendly, adding a search bar to the website sidebar is a great way to do it. With a search bar, your visitors can quickly find the content they’re looking for without having to navigate through your website’s menus.
There are a few ways to add a search bar to your WordPress website, but one of the easiest ways is to use the WordPress search widget. Here’s how to do it:
- Go to your WordPress dashboard and navigate to the Appearance section.
- Click on Widgets.
- Find the search widget and drag it to the sidebar area where you want the search bar to appear.
- Customize the widget’s settings to your liking. For example, you can choose whether to display the search bar’s label, placeholder text, and button text.
If you want to add a search block to your website’s navigation bar, you’ll need to use a plugin or custom code. However, adding a search bar to the sidebar is usually a simpler and more straightforward option.
By default, the WordPress search widget will add the search bar to your website’s sidebar. However, you can also add the search widget to other widget areas if you prefer. For example, you might want to add the search widget to your website’s footer or header area.
Overall, adding a search bar to your website’s sidebar is a simple and effective way to improve your website’s user experience. With just a few clicks, as a website owner, you can make it easier for your visitors to find the content they’re looking for.
Customizing the Search Bar
Adding a search bar to your WordPress website is a great way to help your visitors find the content they are looking for quickly and easily. However, you may want to customize the search bar to make it more visually appealing and functional. Here are some tips on how to customize your search bar:
Changing the Search Bar Appearance
If you want to change the appearance of your search bar, you can do so using custom CSS. This requires a bit of technical knowledge, but it allows you to make your search bar look exactly how you want it to. To get started, go to your theme editor and find the CSS file for your theme. Then, add your custom CSS code to the file and save your changes.
Alternatively, you can use a plugin like the SearchWP plugin to customize the appearance of your search bar. With the premium version of SearchWP, you can change the background color, text color, and more. You can also use the power of Google to improve your search and get more relevant results.
Advanced Customization
If you want to take your customization to the next level, you can use a plugin like the Shelf plugin. This plugin allows you to create your own custom search box and display it on your website in any location you choose. You can also use the plugin to customize the display settings for your search results.
Another option is to add a search tab to your navigation menu. To do this, go to your nav menu and add a new menu item. Then, select the “Search” tab from the drop-down menu and save your changes.
Overall, customizing your search bar can take a lot of time and effort, but it can be worth it to create a better user experience for your visitors. Consider using one of the best search plugins available to make the process easier and more efficient.
Conclusion
Congratulations! You have successfully learned how to add a search bar to your WordPress site. Adding a search bar to your website can improve the user experience and make it easier for visitors to do an internal search and find the information they need. Every blog page should have a default search bar visible for ease of navigation.
There are several ways to add a search bar to your site, including using a widget, a plugin, or a block. The most popular way is to add it as a widget, which is easy to do from the WordPress dashboard. You can also add it to your main menu, header, or custom location using a plugin or custom code.
In this guide, we have provided detailed instructions on how to add a search bar to your WordPress site using different methods. You can choose the one that best suits your needs and preferences.
Remember to optimize your search bar by using relevant search terms and keywords. This will help visitors find your blog posts and pages more easily.
Adding a search bar to your WordPress site can be done in just a few minutes and is an easy way to improve your website’s functionality. We hope this guide has been helpful and informative. Happy searching!
Related: How much does Samcart cost?