This post may contain affiliate links. If you use these links to buy something we may earn a commission at no extra cost to you. Thank you for your support!
Can you trim a YouTube video after uploading it?
Editing videos even after uploading is common and sometimes extremely important.
Videos that have already been checked and uploaded may still need some adjustments. Some of them would only require minimal changes, so doing it all over again might not be necessary – hence the post-upload edits.
Been there, done that.
Uploading a brand new video and then spotting something you don’t want to be inside the video is not great.
What about the good news?
You can cut and trim YouTube videos after they have been uploaded without having to begin from the start. Yay!
How, you ask? Let’s go.

You might be interested in: Freelance Videographer Hourly Rate: Ultimate Guide
How Can You Trim A YouTube Video After Uploading – The Easy Way.
Here’s how you trim a video after it’s been uploaded using YouTube’s built-in editor:
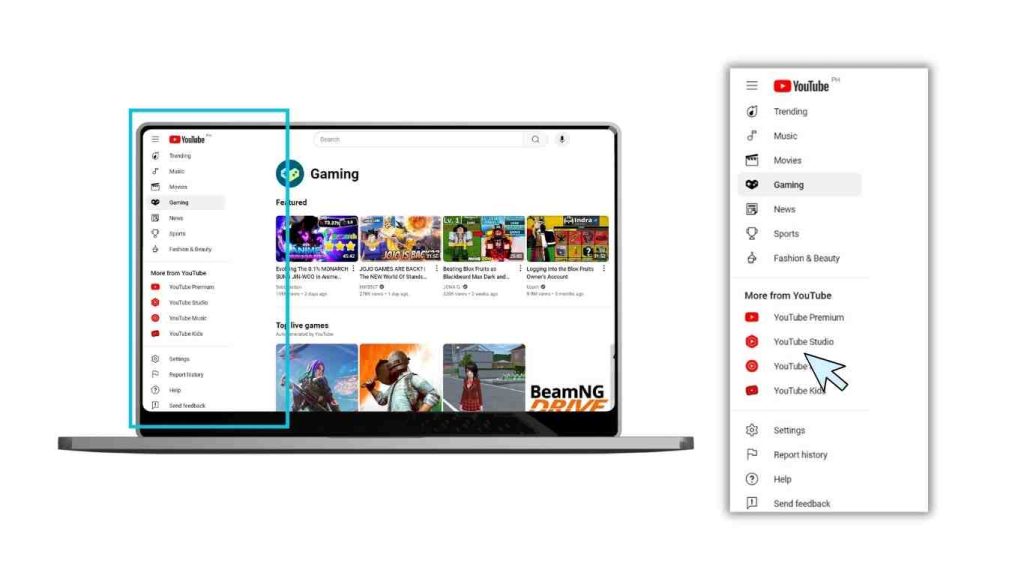
- Accessing YouTube Studio:
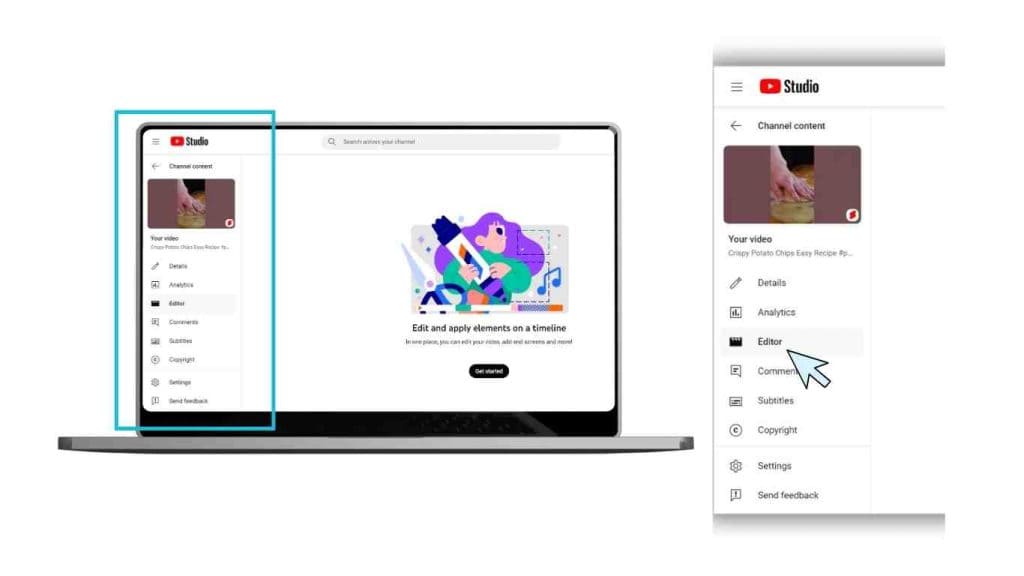
Sign in to your YouTube channel. Select YouTube Studio from the menu on the left side of the screen.
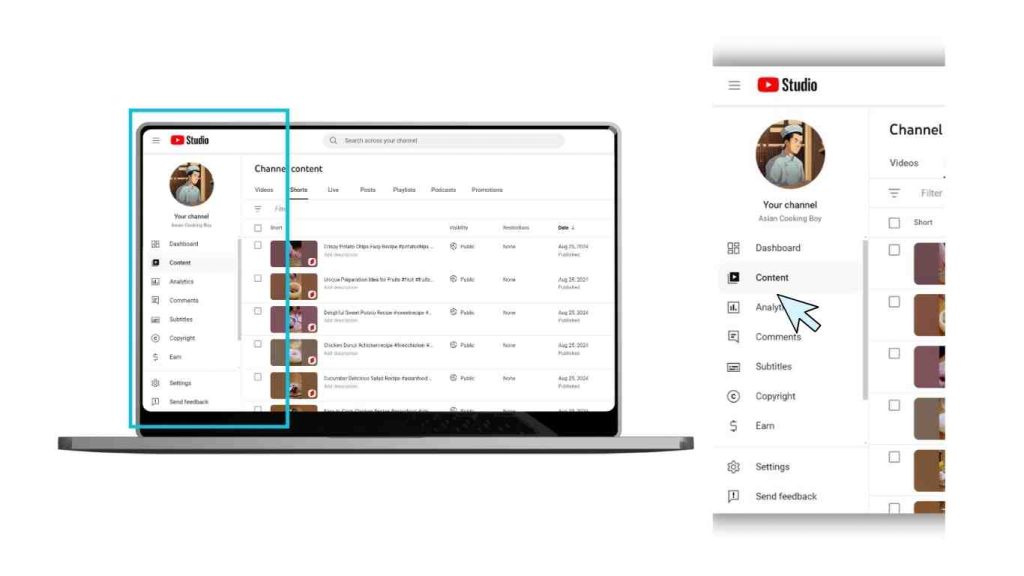
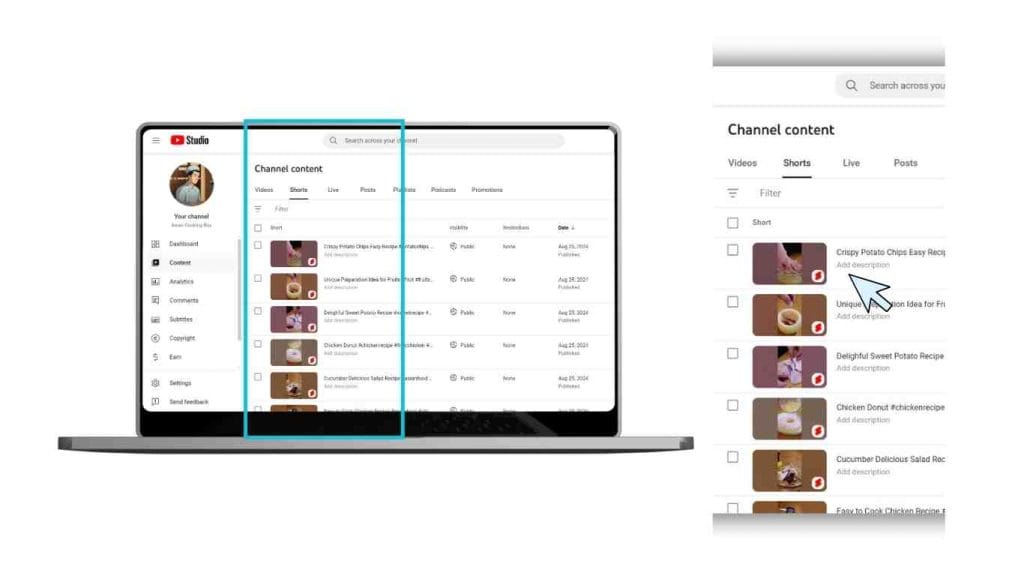
- Navigating to the ‘Editor’ tab:
On the left sidebar, click on ‘Content’ to see your uploaded videos. Click on the “Editor” button next to the video you want to cut.
- Selecting the Trim Feature:
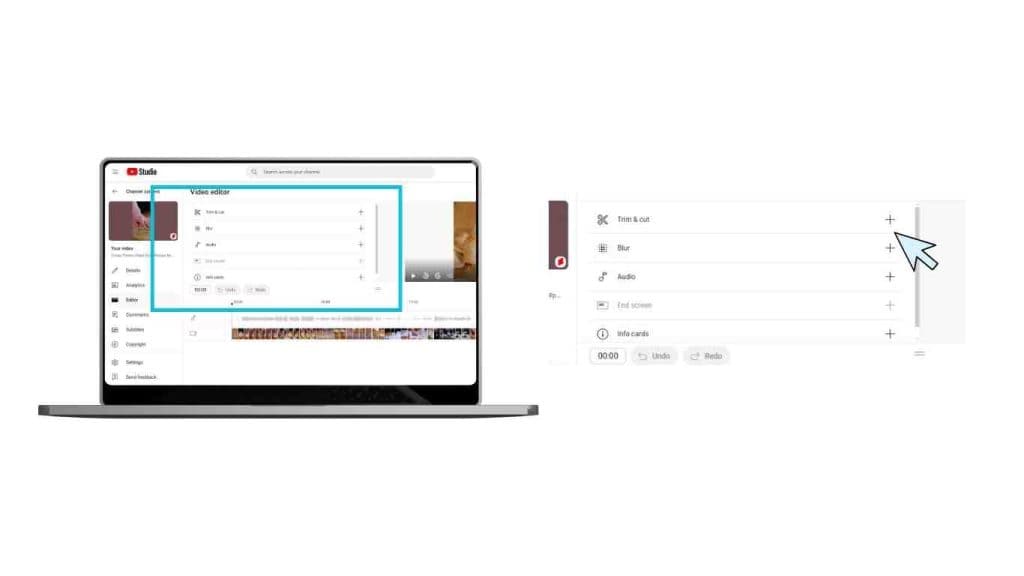
In the Editor window, click on “Trim.” You can change your video’s start and end times with the buttons.
- Adjusting the Start and End Points:
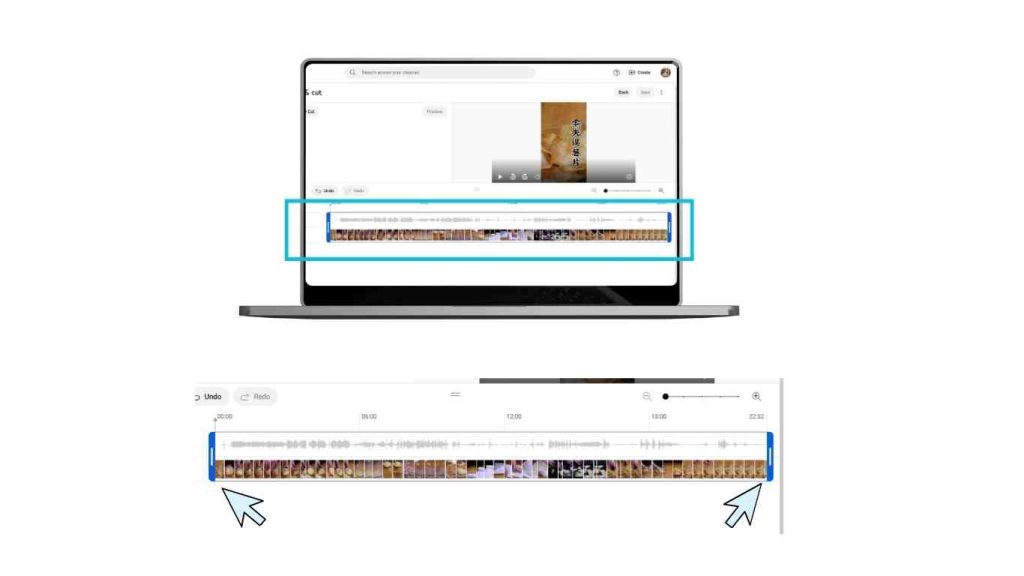
Move the slider to cut out parts of the video that you do not want to see. You can also use the right portion of the timeline to cut the end of your video.
- Saving Changes:
Once you’re happy with the edit, click ‘Save’. Depending on the quality of the video, the processing could take a few minutes.
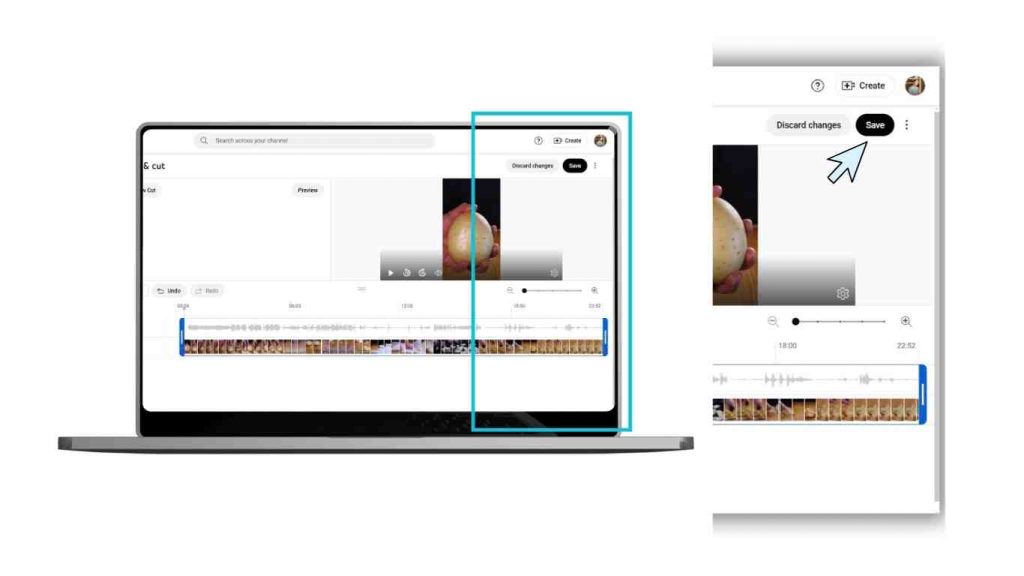
If you follow these steps, your edited video will remain high-quality while only removing the parts you do not want.
You might be interested in: TikTok to MP3: Guide To Convert Videos
What Happens After You Trim The Video Using The YouTube Editor?
The trimmed video takes the place of the original after it has been cut.
This means that the URL, views, comments, and engagement will stay the same for the new video version.
There is no need to post videos again because the process is completed automatically. After trimming, the existing video file is changed only slightly, so its SEO success is not affected. Note, though, that the parts of the video that were cut off cannot be recovered after saving.
However, remember this—I learned this the hard way—once you trim and save a piece, the part you cut off is gone for good.
I cut out a part of one of my videos because I thought I would not need it anymore, but then I remembered I could use it again in another project.
Too late, but once bitten, twice shy.
Since you can not undo what you have done, you need to be sure before clicking the “Save” button.
Keep a copy of the original video file, just in case.
In general, though, the trimming tool saves a lot of time and keeps your video looking good without you having to re-upload it.
You might be interested in: Instagram to MP4: Easy Video Download Guide
Pros and Cons Of Trimming After Upload
Advantages:
- No need to delete and re-upload your original video.
- It improves the viewer experience by getting rid of boring or unnecessary parts.
- Trimming directly in YouTube Studio is quick and easy, requiring no external tools.
Disadvantages:
- The trim tool only allows you to cut the beginning or end screen of the video—you cannot remove sections or any portion of the video from the middle.
- Trimming is a permanent change, so ensure you’re certain before saving.
You might be interested in: Best Guide to Using a Pinterest Video Downloader In 7 Quick Steps
Familiarizing Yourself With YouTube’s Built-In Editing Tools
YouTube’s built-in editing tools are lifesaver for creators. Imagine this: you upload a video, but after it’s live, you realize a part of it feels off—maybe the pacing isn’t right or there’s a section that’s losing viewers’ attention.
Normally, you’d have to take the video down, re-edit, and re-upload it, but YouTube Studio has a solution. With its built-in editor, you can make simple yet powerful adjustments without starting from scratch.
In YouTube Studio, you can trim sections of your video, apply blur effects, add end screens, and even tweak the aspect ratio. The trim feature is especially handy, letting you remove unwanted parts quickly, so your video keeps viewers engaged. While it’s not as advanced as standalone editing software, it’s perfect for making quick fixes without the hassle of re-uploading.
Android Users
For creators editing videos on Android devices, the process of trimming the desired part of the video can be streamlined using various apps. While YouTube’s built-in editor works well, many opt for external apps like EaseUS Video Editor or Final Cut Pro for more advanced editing capabilities. These tools provide a simple interface where you can easily make a new cut using a yellow slider in the timeline panel to trim out the parts you no longer need.
After trimming, the new version of the video can be previewed, and you can ensure the edits align perfectly. For Android users, accessing these tools on Android phones allows flexibility when editing. When you’re ready to finalize, drag the yellow slider to the end of the video and make sure no line of text or important detail is missed before saving.
If you’re looking for guidance, many apps and editors also offer helpful resources located at the bottom of the table of contents page to ensure you’re comfortable with every aspect of the trimming process.
This brings us to the next section – Alternatives to YouTube’s editor.
You might be interested in: Instagram Reel Maker: Best 2024 Guide
Alternatives To YouTube’s Editor
While YouTube’s editor is convenient, third-party tools or online video editors exist for more advanced editing. External apps like the following allow creators to cut, trim, and add effects before re-uploading the final product:
- Final Cut Pro
- EaseUS Video Editor
- QuickTime Player
- DaVinci Resolve
- Adobe Premiere
This software allows creators to cut, trim, and add effects before re-uploading the final output. These tools provide more flexibility, such as removing unwanted parts from the middle of a video and improving overall production quality. For creators who prefer online tools, you can check out the following:
- Online Video Cutter
- AI features
These online editors offer strong alternatives to YouTube Studio.
Personal recommendations:
When editing a downloaded YouTube video, you might want to use Microsoft Photos as a good choice for basic video adjustments.
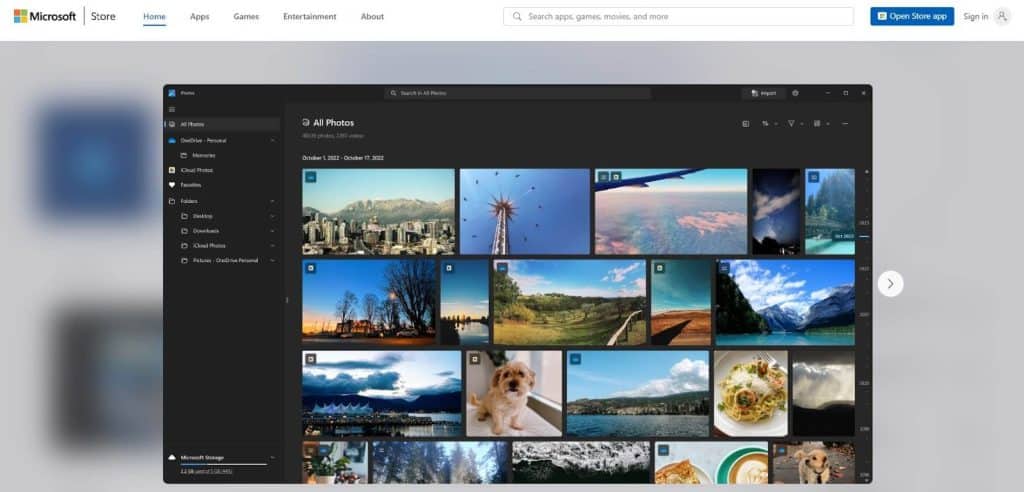
This built-in editor provides simple steps for trimming unwanted sections or improving video quality without needing a third-party tool.
After clicking the download button, open your video, and select the trim feature in the blue box to remove unnecessary parts. You can also create a new project for further edits.
If you’re working on live or recorded content for the YouTube Partner Program, trimming is essential to ensure you only include important information.
Although YouTube’s platform offers basic editing tools like the trim feature, creators often explore different tools or the best YouTube video editor alternatives for more flexibility.
By following the steps to trim your video using the screen recorder feature or another built-in editor, your trimmed parts will be cut seamlessly, allowing the video to open smoothly with relevant keywords intact for SEO.
You might be interested in: 10 Best Tools for Freelancing With AI
Tips To Ensure Error-Free Video Before Uploading
The best way to avoid post-upload trimming is to edit your video thoroughly before uploading. Make sure your video is perfect and free of errors. Always check your video clips for parts that are not needed and cut them out before you share them. This way, you will never need to use YouTube’s trim tool after you have uploaded a video.
You might be interested in: How to React to Instagram Message: Best Tips and Tricks
Frequently Asked Questions
Will YouTube notify my subscribers after trimming?
No, trimming a video on YouTube will not send new notifications to your subscribers. Small changes are made that do not affect how your viewer sees the video.
How long does it take for changes to apply after trimming?
The length and quality of the video affect how long it takes to process. The processing might take a few minutes, but you can still watch the video while it is going on.
Can I use the trim feature on mobile devices?
You can use YouTube Studio on your desktop to access YouTube’s trimming tool. The YouTube mobile app lets you make simple changes, but the PC version is where you should do it for the best results.
Can I add new features like end screens or music while trimming?
You can use YouTube Studio’s editor to add end screens, blur effects, or even music tracks. Along with the trimming option, these tools are also offered.
Does trimming affect the video’s quality?
No, trimming the video in YouTube Studio does not change the quality of the video. The quality of the cut version will be the same as the quality of the original.
Wrapping Up
Youtube Studio’s built-in video editor makes it easy to trim any kind of video after being uploaded. However, to get the best results and keep the quality of your video, you should cut out any parts that are not needed before uploading it or use external apps that give you more control. No matter how much experience you have as a content creator, you should know how to change your videos as needed. Check out YouTube Studio right now to improve your posts so that more people can see them.
You might be interested in: Best Work from Home Computer Setup: Tips To Do It Like A Pro

